Flag Quest Writeup
Hi today I will write about a cool video game challenge focused on memory hacking and using features of the CheatEngine (abbreviated CE from now on) tool, that I found interesting… Not saying that because I created it 😜
More than giving a basic simple solve, I'll try to delve in the more advanced features of Cheat Engine in order to create a cool, complete and modular hack, with a GUI. Some parts will go pretty in-depth, don't hesitate skipping some parts if you only want an hackish "works only once" solve. So let's start the game!
*Note: this writeup assumes you have a basic understanding of the Cheat Engine tool. I recommend having watched my talk on the subject before!

# level 1 part 1: get rich quick
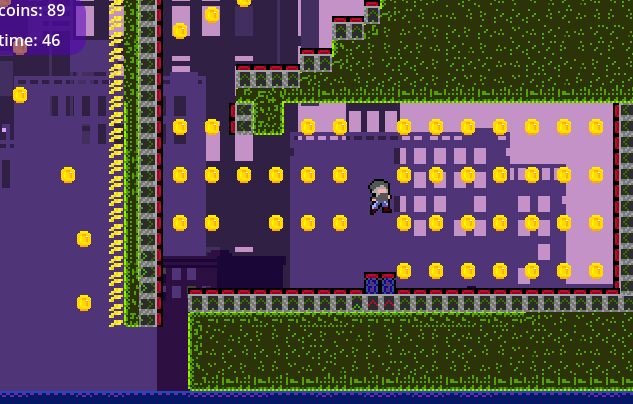
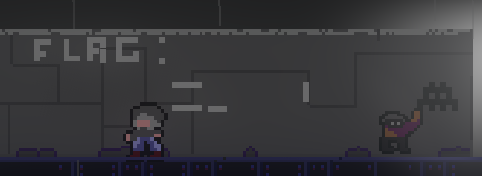
we start the game with a little platformer sequence. After 2 levels, we are interrupted by the antagonist of the game that asks us to recover 250 coins or more. Problem: there aren't as many coins in the level!
# basic memory patching
| relevant resources | author | type |
|---|---|---|
| Part 1, introduction to scan types | Stephen Chapman | video |
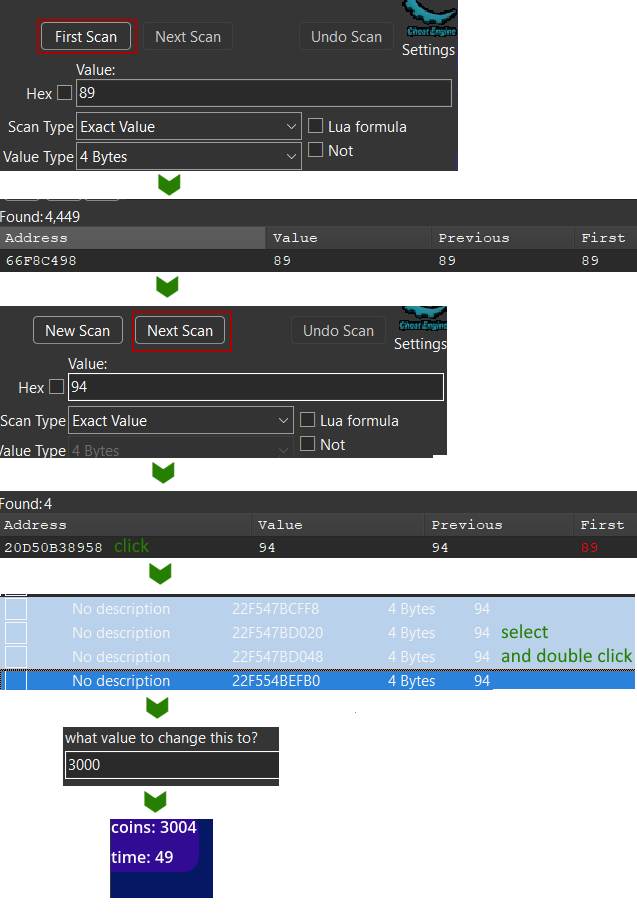
So how to get more coins? Simple, we start Cheat Engine. search for the coin value in memory, and change it! Cheat Engine will search in all the memory of the program the value we are looking for, and save the list of addresses that match. When the value change, we tell cheat engine to search in this list the address that now have the updated value, and process by elimination.
But images speak a thousand words:
# making a persistent hack with autoAssembly
| relevant resource | author | type |
|---|---|---|
| Part 8: Memory Viewer, Writes To/Accesses An Address, Debugger, Etc. | Stephen Chapman | video |
| Part 9: Array of Byte (AOB) Scans Demystified! | ||
| Code Injection: Full | CE Wiki | article |
Now let's go beyond the assignement, and create a persistent hack. Indeed, previously we only found a memory address, that is not persistent. When you relaunch the game, or even restart the level, this address will change!
So we will directly find the code instruction that writes to this memory address and patch it with custom code. As the code address never changes (except on game updates), we will have a persistent hack. Cheat Engine has multiple features that makes it easy to do this patch:
- the "find out what writes to this address" option
- Autoassemby and its templates
note
We could use pointer scanning to achieve a similar result more easily. However I had some issues with this method, auto assembly is more consistent in addition of being more modular.
again the process described visually:
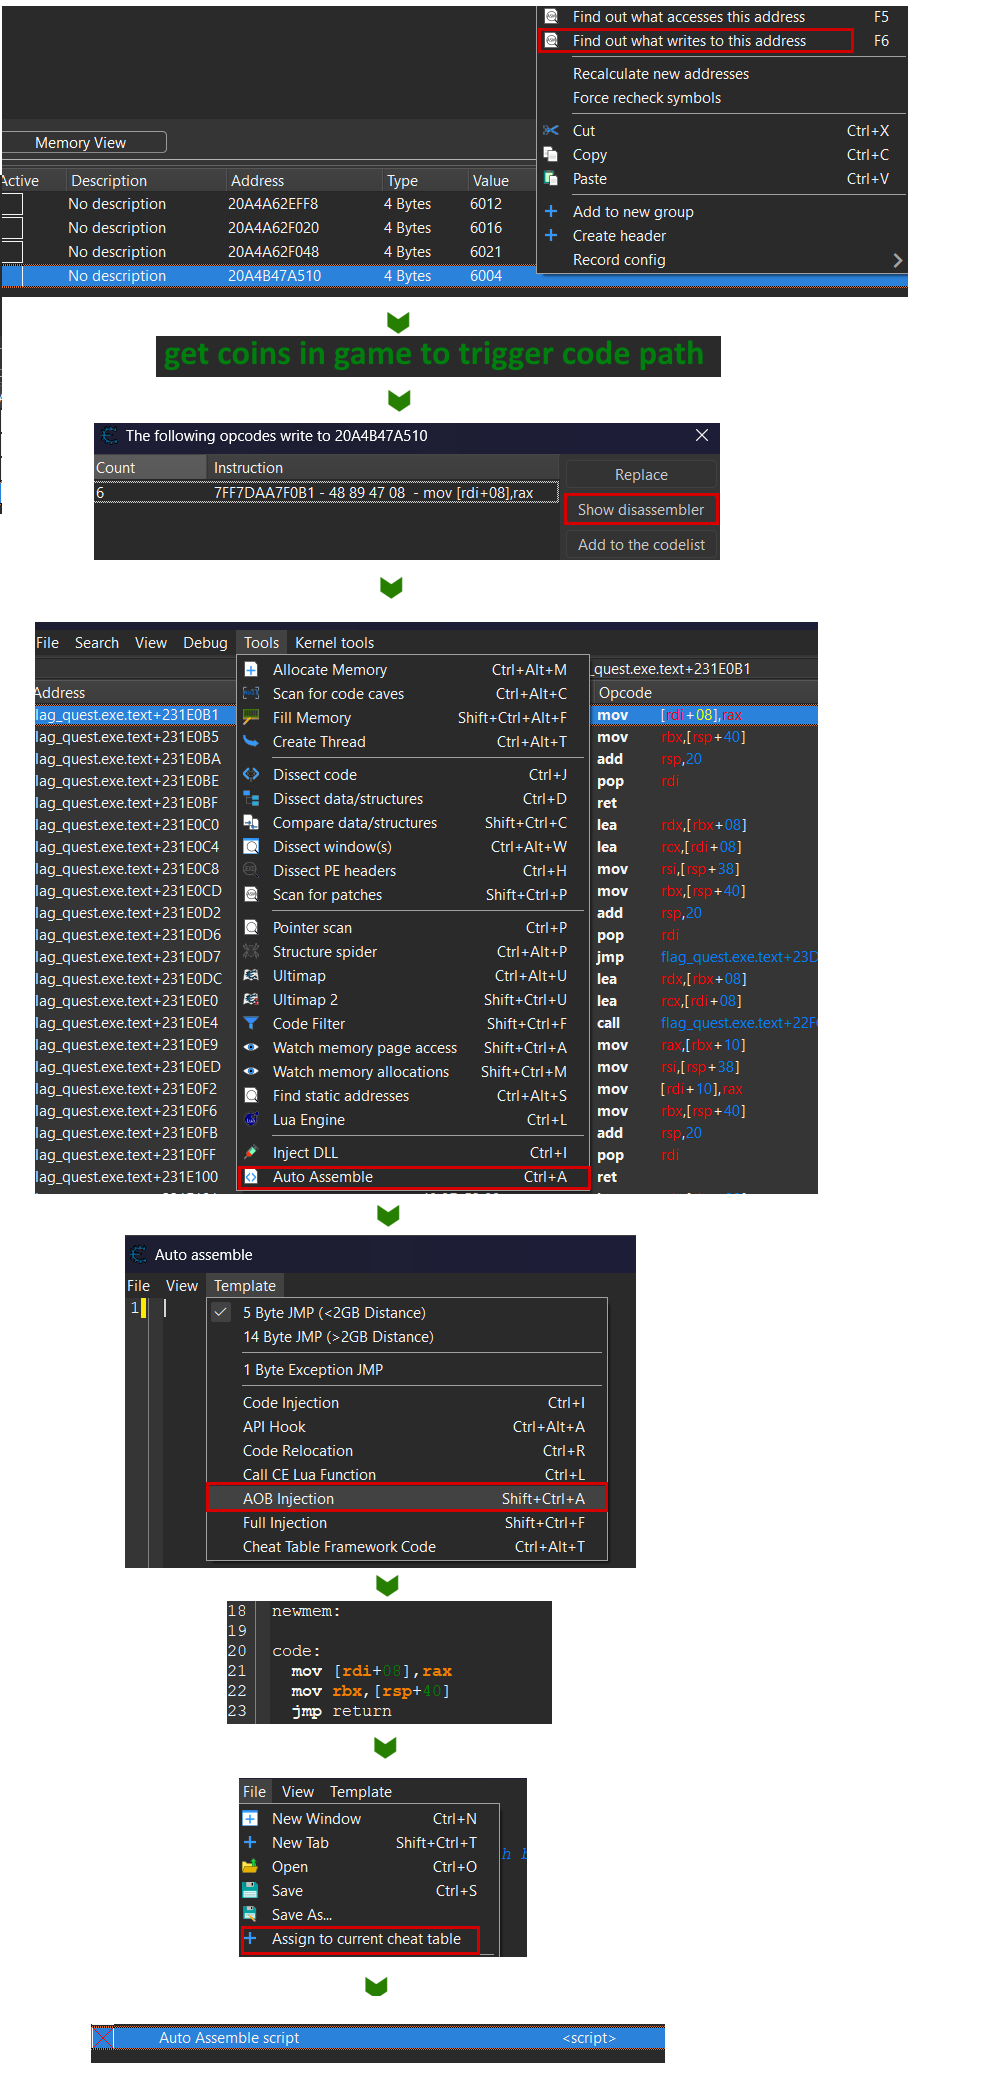
- the "find out what writes to this address" option on our coin address.
- This attaches a debugger on the process
- We get a coin in the game to trigger this breakpoint
- We see that the
mov [rdi+08], raxinstruction is triggered- If we attached a manual breakpoint on this instruction, we could see that
raxvalue is the coin count
- If we attached a manual breakpoint on this instruction, we could see that
- We use the AutoAssembler feature with it's AOB injection template that will automagically:
- Allocate some memory where we can write any code we want.
- Replace the original instruction (and some surrounding) in the game's memory with a jump to this new controlled memory addr.
- in our new custom code, write a template with the original instruction(s) and add a jump back to the original next instruction, to keep the control flow/ the game running.
- Add a "disable" section in the custom script, that automatically de-allocate the cheat memory, repatch the game with it's original code, thus removing any trace of the cheat. And you can disable a script just by pressing a button in the Cheat Engine UI.
here an annotated version of the generated script:
[ENABLE] // code executed at hack launch

// find the addr of the original instruction
aobscanmodule(INJECT,flag_quest.exe,48 89 47 08 48 8B 5C 24 40) // should be unique
// allocate memory where we put our new code
alloc(newmem,$1000,INJECT)

label(code)
label(return)

// hack code here
newmem:

code:
  // your new code here
  // add rax, 2
  // original instructions replica
  mov [rdi+08],rax
  mov rbx,[rsp+40]
  // go back to game next instruction
  jmp return

// at original addr of instruction,
// jump to our code
INJECT:
  jmp newmem
  nop 4
return:
registersymbol(INJECT)

[DISABLE] // code executed at hack stop

// put back original instructions
// at the original game memory addr
INJECT:
  db 48 89 47 08 48 8B 5C 24 40

// deallocate all cheat memory
unregistersymbol(INJECT)
dealloc(newmem)
# AOB injection bonus
| relevant resource | author | type |
|---|---|---|
| Auto Assembler - AOBs | Wiki | Article |
I didn't introduce you to the classic "Code injection" template. It is simpler but has one flaw: it patches a static game code address, that will change at any game update, if a single unrelated feature is modified.
// hardcoded address, breaks at any update
define(address,"flag_quest.exe"+231F0B1)
...
address:
  jmp newmem
With The "AOB injection" template , CE will search the signature of the instruction in the game memory, to find dynamically it's address. When the game is updated, as long as the "coin update" code is unmodified, the cheat will keep working.
// dynamic address, found at cheat launch
aobscanmodule(INJECT,flag_quest.exe,48 89 47 08 48 8B 5C 24 40) // should be unique
alloc(newmem,$1000,INJECT)
...
INJECT:
  jmp newmem
notice the should be unique: there could be multiple similar instructions. In this case you will encounter bugs, and the fix is finding a more unique signature. The signature being the instructions you are patching, and the ones surrounding them before and after. You can go in the memory viewer and copy a few more surrounding bytes to get a longer and more unique signature.
# writing our custom instructions
| relevant resource | author | type |
|---|---|---|
| User set variables which only exist in cheat engine. | EllesarDragon & FrechetDerivative |
Reddit article |
So the Cheat Engine template gives us code that… does nothing. For now! But now we can place our custom code (as long as we know some assembler basics, sorry 😢)
We know that the mov [rdi+08], rax puts the value of rax inside the memory address of the coin counter (it will be read by other instructions)
So we only have to put a big value in rax, like 9999.
in asm it's as simple as:
code:
    // your custom code
    mov rax, #9999
    // rest of instructions
    mov [rdi+08],rax
	...
but it's not enough for us. We don't want a simple infinite coins cheat. Maybe the game is fun, but we find it too hard to grind for coins, so we would like to create an adjustable difficulty setting, where we could make picking up a coin give us two more. or 5, or 10.
So to make a dynamic hack… we can just allocate a variable! let's create the coinsMultiplier one.
Here is how we patch our cheat code:
[ENABLE]
alloc(coinsMultiplier ,2, "flag_quest.exe"+231F0B1)
registerSymbol(coinsMultiplier)
... // other allocations

coinsMultiplier:
  dw 1 // set value to 1 by default
...
code:
  add rax, [coinsMultiplier]
  sub rax, 1 // add (multiplier - 1)
  // rest of instructions
  mov [rdi+08],rax
  ...

[DISABLE]
unregisterSymbol(coinsMultiplier)
dealloc(coinsMultiplier)
... // other deallocs + mem repatch
full script : flagquest_level1_coins_multiplier.CEA
Once you created your script, you can save it in a custom file, and more importantly, add it to your main CE address list by clicking on "File" -> "Assign to current Cheat table". There you will see it and be able to enable/disable it in one click on it's left checkbox.
So we created our variable coinsMultiplier , set it to 1 by default, and used it to add it's value to the coin counter each time we pick a coin.
But how do we set it's value? You can from any other Cheat Engine ASM or LUA script (we'll see later), but for now, we can set it in the CE interface.
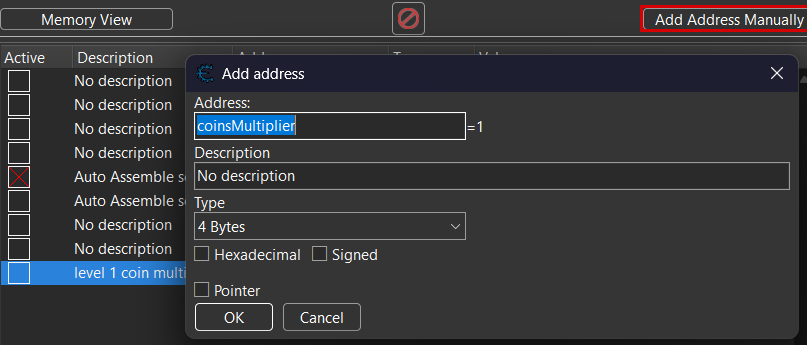
Just go back to the CE main UI, click on "add address manually", and type the name of your variable. Now you will be able to change it like you changed your coin's value previously!
# nothing is simple: bugs with shared instructions
| relevant resource | author | type |
|---|---|---|
| Cheat Engine Shared OpCode Tutorial | Guided hacking | Video |
OK, so i lied to you. Maybe you tried the code in the previous section and maybe it worked. But most probably it made your game crash, immediately or some time later. Why? Simple: I don't know exactly what I coded, and apparently the code for setting the coin counter is used for setting other unrelated values .
Of course, I don't know what I coded because I wrote it in an interpreted language, so the game engine does it's own funky stuff. It's not because I'm a bad programmer! At least not here…
So how do you find the difference between one legitimate call to your coin setting code, and one that has nothing to do with it? We check the memory around each call to this instruction, and try to find unique patterns and hardcoded values inside.
Who know, maybe when the coin method is called, rbx+8 == 72 or in all other calls rdi+24 == 1?
This sounds tedious, to put a debugger on the instruction, manually check all calls and their memory… Thankfully, Cheat Engine again to the rescue with 2 features: Find out what addresses this instruction accesses and scan for commonalities.
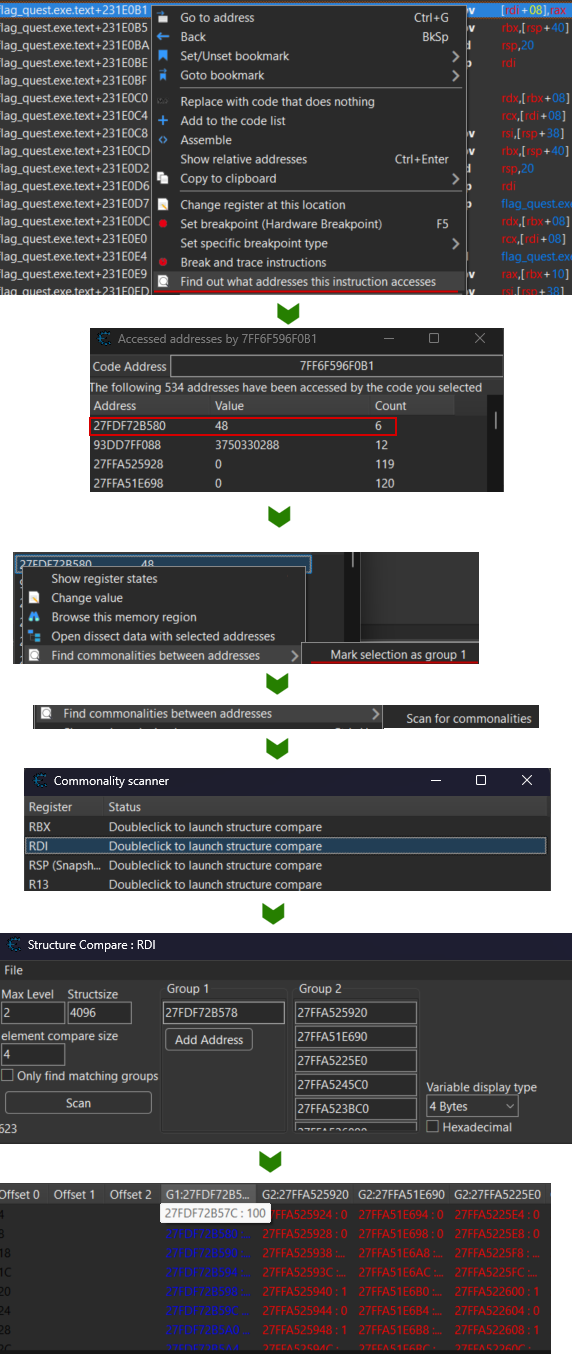
Let's do this in a few clicks:
- in the disassembler view, right-click on the coin setting instruction -> Find out what addresses this instruction accesses
- You have lots of instructions listed, with their number of calls and their last value passed (here rax)
- All instructions listed here are false positive. pick a coin in the game, and you should find the call that we want to isolate. "count" should be "1" and "Value" your number of coins. (you can click on "count" to sort by ascending order)
- right click on the value -> "Find commonalities between addresses" -> "mark selection as group 1"
- If you have only a few values in the list, you can start the commonality scan. Alas, here we have 500+ addresses, so only handpick 6 or more at random, and "Find commonalities …" -> "mark selection as group 2"
- Start the scan with "Find commonalities …" -> "scan for commonalities"
- If you are very lucky, you will get an output like "Register RAX: Group '2' has common value '0x42'", effectively meaning that you can do
if rax == 0: pass - Else, it will propose to "launch structure compare", where you will be able to manually compare the values around rax , rdi or other registers to search for patterns.
summarized with a screenshot:
waring!
Okay, super useful no? well, you know what? I lied to you. Ooops, I did it again.
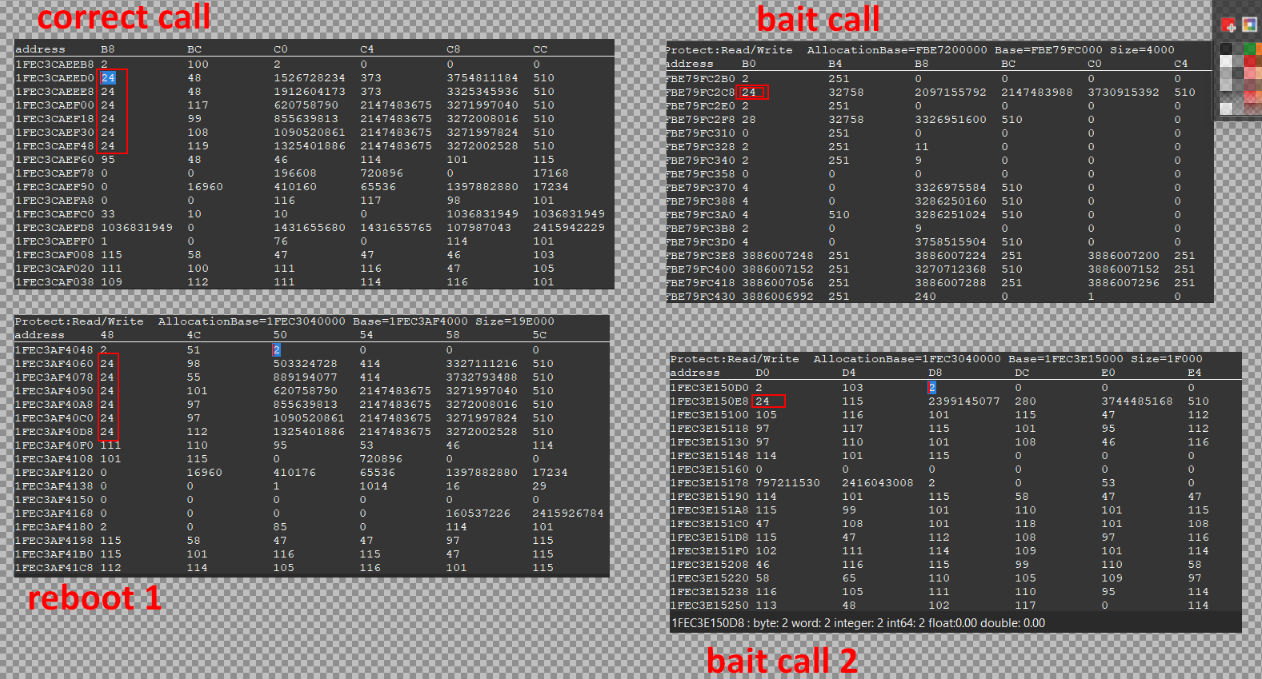
This feature is super useful, but it has one flaw: it doesn't work across game relaunches. So values you may find "hardcoded" are indeed not all static.
In the end, manual scanning is the most reliable way, even if tedious. manual way is:
- putting a breakpoint on your coin-changing instruction
- debug only when you know the correct instruction is called
- conditional breakpoints can help you filter unwanted calls
- copy all values between RDI-128 and RDI+128 (arbitrary range)
- reboot the game and repeat 2 or 3 times
- compare all values
in paintwith a script you coded (or asked ChatGPT to do)
you can find the script I use to compare memory dumps and find common offsets. example usage:
cat ./comm_test.txt
	80 F4 23 40 F6
	65 F4 8A 40 26
	68 F4 23 40 F6
python ./commonalities_scanner.py ./comm_test.txt 3
	-2 = F4
	0 = 40
in the end, we found a unique pattern for our coin-setter script! we can add these ASM conditions before our custom value-changing code:
code: // if ([rdi+0x18] == [rdi+0x30] == [rdi+0x48] == 0x18)
  cmp [rdi+18], 18
  jne normal
  cmp [rdi+30], 18
  jne normal
  cmp [rdi+48], 18
  jne normal
custom: // your coin setting code
  add rax, [coinsMultiplier]
  sub rax, 1
normal: // normal code execution
  mov [rdi+08],rax
  mov rbx,[rsp+40]
  jmp return
Oof, that was a very long an in-depth dive in advanced CE features. Let's go back on an higher level 😀 (but i don't promise it won't happen again…)
full script : flagquest_level1_coins_multiplier.CEA
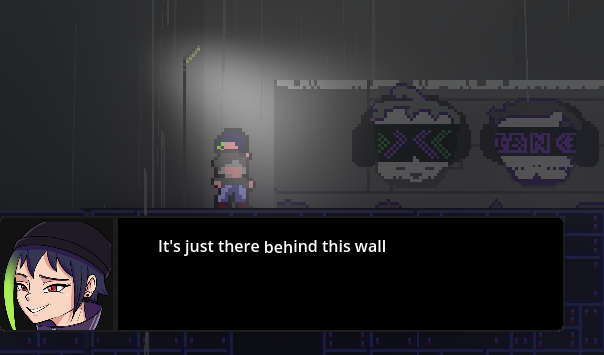
# level 1 part 2: breaking the barriers
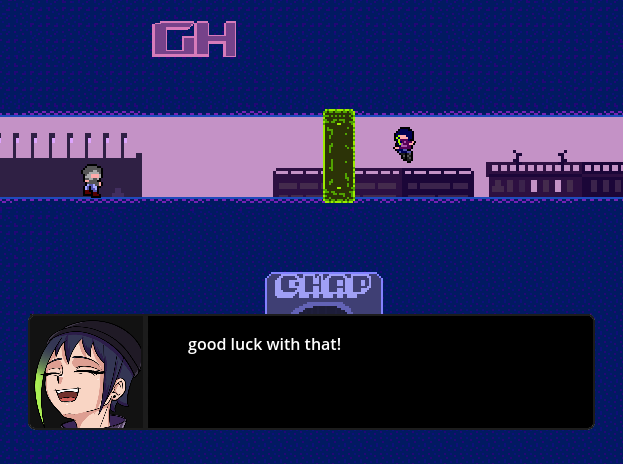
After a little platforming challenge, we are again blocked by the vilainess, that puts a wall in the middle of the road. But what if we could teleport?
Solving it is simple, even if a bit long: as we did with the coins, the position of the character is a value in memory that we can find and change. Only problem, is that we don't know the exact position of our character.
Again, from the main page of Cheat Engine, we can launch a scan, but instead of searching for a known integer, we search "unknown initial value" and type "float" (positions are 99% floating points in video game)
We have a lot of values, so to filter, we have to move our character and find reflected changes in our scanned values. We will try to find the "X" (horizontal) position of our character so:
- Move to the right -> "increased value"
- Move to the left -> "decreased value"
- jump -> "unchanged value"
do this 6 or 10 times, and in the end you should find a smaller list of values. Then try to manually edit them (tip: you can select multiple to edit them in one go). if your character teleported, well done, you found the correct address!
Now that we found the "X" value, do we have to repeat this for the "Y"? let's be smart: values like the position are usually stored contiguously in memory, what if we could browse it and search our value?
Again there's a feature for that: right click on your found "X" value -> "browse this memory region"
You have a memory view in hexadecimal, not very readable, so right click -> "display type" -> "float" And tadaa! you have a readable hex view where you see your X position, and 4 bytes after, the Y one. You can't miss it, the values are live updated, and when they change, they blink!
screenshot summary time:
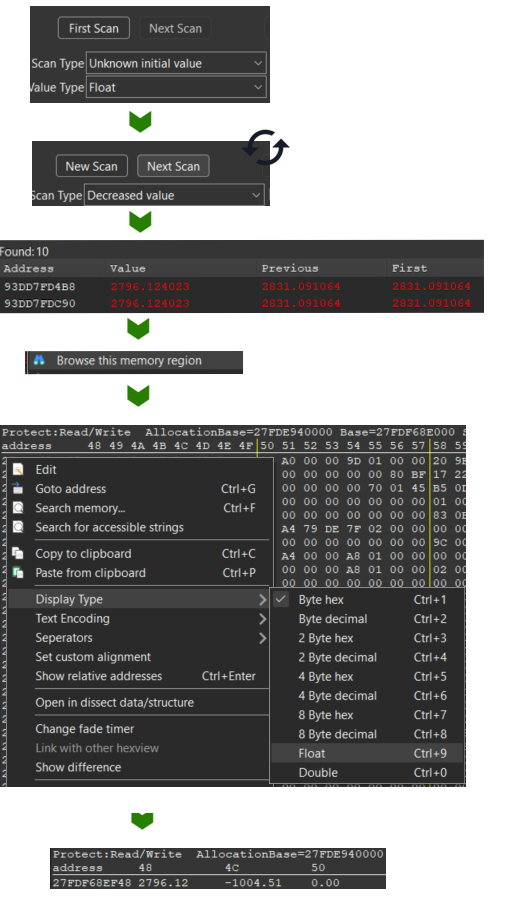
now just change your X position to teleport beyond the wall!
# autoassembly: getting the position address
We can repeat the steps of the first level to create a CE code but… Here we don't want to set an hardcoded value or create a multiplier. We could create hotkeys to teleport, but we'll see that later…
For now, we can create a script that will store the address of the X and Y positions in variables. They will be accessible from the CE interface, just like we did manually before, but this time persistent across game reboots.
First create an AutoAssembler script (refer to previous step, find correct instruction and check for commonalities)
When you create the script, you find that the instruction for setting the X value is movsd [rdi+00000498],xmm1.
xmm1 is the floating point value register. (float values are funky asm values, with their own set of registers and instructions to play with them)
So [rdi+00000498] is the memory address we want to store in our variable, let's name it lev1Xaddr.
here a very simplified version of our script:
[ENABLE]
// other variables allocs
alloc(lev1Xaddr ,8, address)
registerSymbol(lev1Xaddr)

lev1Xaddr:
  dq 0 // qword: 8 bytes

newmem:

code:
  // commonalities check here
custom:
  mov [lev1Xaddr], rdi
  add [lev1Xaddr], 498 // instruction offset
  mov [lev1Yaddr], rdi
  add [lev1Yaddr], 49C //498+4
end: //original instructions
  movsd [rdi+00000498],xmm1
  jmp return
full script: flagquest_level1_position.CEA
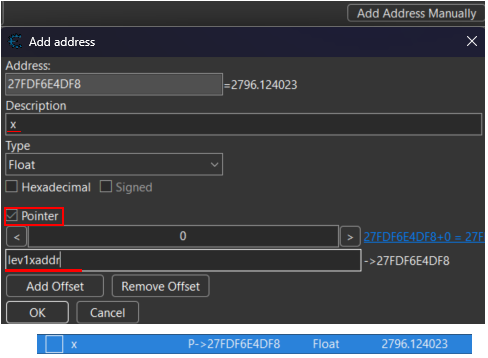
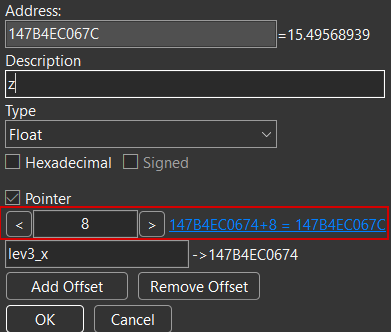
Then to add the lev1Xaddr variable to your address list, click "Add Address Manually" as you did for the coin multiplier previously. But here, check the "pointer" checkbox , and then set "lev1Xaddr" as the address and "x" as description.
And now, if your "flagquest_level1_position" script is enabled, the variable should be automatically populated with the X position of the player when you launch the platformer sequence of the game!
# LUA scripting: creating a teleport hotkey
Now that we have our position address, why not have fun with it, and create a teleport hotkey?
Again Cheat Engine carries us, and keep calm, we won't code in ASM, but in LUA. CE comes with a pretty solid LUA interface and you can directly code cheats with it. Speed Hack , input emulation, memory scanning and access, interaction with AutoAssembly, you name it!
Here we create an hotkey that will move our character 40 pixels to the right when pressing the right keyboard key. (when the game window is focused!)
[ENABLE]

function move(vpos, amount)
  if (getForegroundWindow() == findWindow(null, "flag quest")) then
    local addr = readPointer(getAddressSafe(vpos))
    if (addr ~= nil) then
       writeFloat(addr, readFloat(addr) + amount)
    end
  end
end

function moveRight()
  move("lev1Xaddr", 40)
end

hk = createHotkey(moveRight, VK_D)

[DISABLE]
hk.destroy()
Again, you can find the full script for teleporting in the 4 directions here:flagquest_level1_teleport_kbshortcuts.CEA .
You can find the keyboard key codes on the wiki.
# level 1 part 3: no (code) filters
| relevant resources | author | type |
|---|---|---|
| How to Use Code Filter in Cheat Engine! | Stephen Chapman | video |
Ok, teleporting was fun, but now the villainess told us it won't work anymore… Good news, we now have a double jump! Wait, we don't have it anymore, and now there's a huge impassable gap…
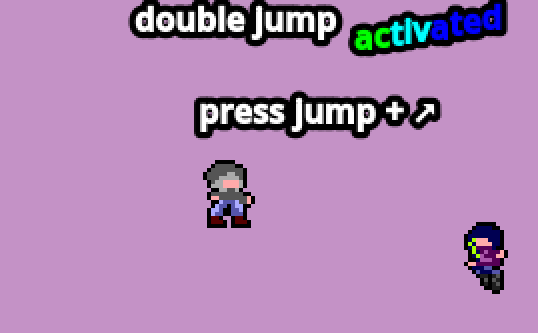
So we know there is a double jump mechanism, but it is disabled. We can re-enable it temporarily by retrying the level. There must be a boolean variable "isDoubleJumpActivated", but it must be quite tedious to find with the memory scan…
What we would like to do is find the instruction in the code that is checked when we try to double jump, and replace it to re-enable it. But that would mean we have to set thousands of breakpoints on all "if" conditions of the game. Impossible… but not for Cheat Engine!
The Code Filter functionality does exactly that, from GUI, allowing you to filter instructions just like we did with memory values.
note
If you have an Intel CPU on your device, you can use the "Ultimap" feature that is equivalent, and supposedly more powerful.
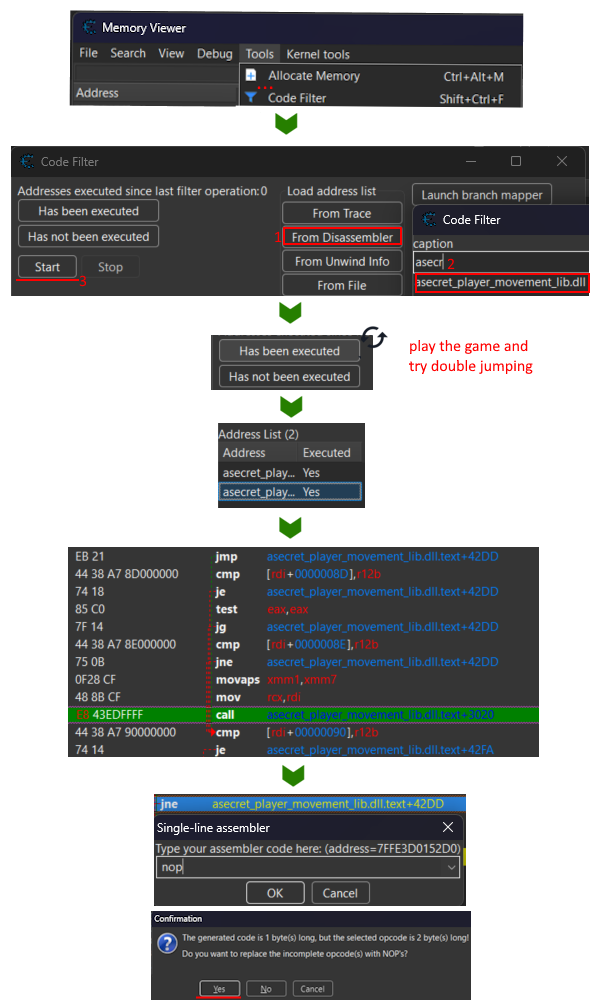
How it works:
- Go to "Memory Viewer" -> Tools -> "Code Filter"
- choose "Load Address list : From Disassembler" (I tried other methods with no good results)
- You can choose to scan in the executable or the libraries it loads. Now is guessing time, as the condition we look for is the "
asecret_player_movement_lib" . Still it's not so secret, as it was given along the executable. - Start the analysis, and filter the addresses by playing the game.
- If you didn't double jump -> "has not been executed"
- if you double jumped -> "has been executed"
- repeat until you have only 2 addesses, the second one (+42D8) is the correct one
when you click on the instruction, you see it in the memory viewer/disassembler:
cmp [rdi+0000008D],r12b // if not isDoubleJumpActivated
je asecret_player_movement_lib.dll.text+42DD
	test eax,eax // dunno, lol
	jg asecret_player_movement_lib.dll.text+42DD
		cmp [rdi+0000008E],r12b // if numberOfJumps <= 2
		jne asecret_player_movement_lib.dll.text+42DD
			movaps xmm1,xmm7
			mov rcx,rdi
			call asecret_player_movement_lib.dll.text+3020 //double jump call
cmp [rdi+00000090],r12b
Indentation added manually, but CE is nice and shows little arrows indicating where jumps lead to.
We see that the instructions found by CE are quite simple: 3 conditions are checked , and then the double jump method is called.
ASM refresher: a condition is generally represented by 2 instructions, a comparison (cmp/test) and then a jump (je: if ==, jg: >, jl: <, jne: !=)
Here we can double click on all jmp instructions, and patch them with the padding nop instruction to unconditionally call the double jump method when the jump button is pressed, enabling infinite jump.
note
The Cheat Engine warns us that the instruction we put is smaller than the one we replace, and it will add
nop's to pad. No problem here, however when the instruction is bigger than the one we replace, CE will warn us too, but this time by overwriting the next instructions and generally crashing the program. That's where AutoAssembler scripts come handy.
again, visual explanation:
note
the code is inside a separate
asecret_player_movement_libDLL. Why? First to make it easier to find for player. But secondly , as the game is coded in an interpreted language, it makes it way harder to find conditions with code filter. As I couldn't solve the challenge while testing myself, I recoded the player movement logic in C++.
What I didn't knew is that the library would be outside of the game binary, making it easy to find and even patch with Ghidra.
# autoassembly: creating an infinite jump script
This time the autoassembly script is… uninteresting. It is literally what you already know to do, instruction patching, without variables or shared instructions. Here is the complete code of the cheat. As always, you can enable/disable it on the fly from the CE interface.
define(address,"asecret_player_movement_lib.dll.text"+42BC)
define(bytes,44 38 A7 8D 00 00 00)

[ENABLE]
assert(address,bytes) // ensure game has not updated or alread patched

address:
  // jump directly to double jump call
  jmp asecret_player_movement_lib.dll.text+42D2
  nop 2

[DISABLE]

address:
  db bytes // put back the original code on disable
# level 2: gotta go fast
| relevant resources | author | type |
|---|---|---|
| LUA CE documentation | Cheat Engine wiki | wiki |
| Lua Tutorial: How to Make an Auto-Clicker in Lua with Cheat Engine! (NSFW) | Stephen Chapman | video |
Here we have some exposition dialog, that is veeeeryyyyyy looooong… How can we speed it up?
note
kudos to the guy I met in CtF that stayed 50 minutes reading all the lore as he said "it was interesting"
This time solution is extremely simple: on the main manu of Cheat Engine there is an "Enable Speedhack" checkbox. click on it, set speed to 50, and enjoy!
Watch out, as you spam "space", at the end there is a check "do you want me to repeat", that is by default set to "yes". We do like some tomfoolery here! Also, if Speedhack does not work, relaunch the game and retry, it should work this time.
# creating an autoclicker
Okay, this challenge was simple, but what if we made it simpler by overcomplicating it? 🤔 clicking by hand is tedious, why not create an Autoclicker in LUA!
The cheat is made more complex by the bait at the end of the dialog: You have to press the "right" key to prevent the dialog from looping. I couldn't find the instruction managing the text display. At first I wanted to scan the memory for the string "Do you want me to repeat", but it took too long. My solution, even if not beautiful, works: we repeatedly spam the "right" key, every 0.1s and 1/10 time we input the "space" key instead. So we have 90% chance of the script working, lgtm ^^'
some code example in LUA for a cheat like this.
{$lua}
if syntaxcheck then return end
[ENABLE]

l2sh_counter = 0
l2sh_timer = createTimer(nil)

l2sh_timer.Enabled = false
l2sh_timer.Interval = 100 -- spam keys every 0.1s

function l2SH_loop(v_timer)
  if ((l2sh_counter == -1) or (l2sh_counter == 750)) then
     l2sh_timer.Enabled = false -- stop after 75s or manual interrupt
     speedhack_setSpeed(1)
     return
  end

  if (getForegroundWindow() ~= findWindow(null, "flag quest")) then
    return -- do not keypresses when game window is not focused
  end

  if ((l2sh_counter % 10) == 0) then
    doKeyPress(VK_SPACE) -- 1/10 sace keypress
  else
      doKeyPress(VK_RIGHT)
  end
  l2sh_counter = l2sh_counter + 1
end

l2sh_timer.OnTimer = l2SH_loop -- put this AFTER method definition
speedhack_setSpeed(500)
l2sh_timer.Enabled = true

[DISABLE]
speedhack_setSpeed(1)
l2sh_timer.destroy() --important!
watch out, in LUA, to correctly stop / destroy your timer at the end.
You can find my full script that also handle manual interruption and adds an hotkey here: flagquest_level2_skipdialog.CEA
# level 3: beyond the wall
| relevant resources | author | type |
|---|---|---|
| Using 3D transforms | Godot Gocs | Wiki |
| Rotation converter | Andre Gaschler | online tool |
| Quaternions and 3d rotation, explained interactively | 3Blue1Brown |
Video |
| Quaternions | Freya Holmer | Video |
This time a "simple" challenge: the flag is behind the wall. But the game in in 2D? That's what you thought… but plot twist, it was 3D from the start!
note
It becomes 3D only starting from this level.
It's hard work making 3D levels…
We already made a teleport cheat, so here we follow the same principle, but with only one more axis.
We move left to right, find the X position, and look in the Memory View for the adjacent XYZ position.
Let's keep it simple, and only change the Z axis, to move our camera beyond the wall. It was 15, let's set it to 8. And we get…
note
If you set
z < 5your character starts falling. I just forgot to extend the floor plane in the game. but then I told myself "whatever, it will be extra challenge for players".
Now be creative on how to solve it, remove gravity, lock the character Y position, good luck!
ok, so the flag can be only seen from a certain angle. We just need to find the adjacent XYZ rota… wait a minute, what is this gibberish?
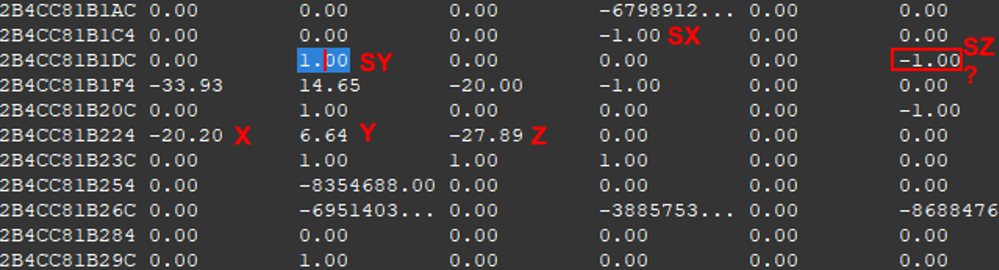
So we have the 3D position, but above we have a dozen of values, some that are between -1 and 1. And we try to set them to 180 or 360, we have strange results? Well everything is clearly explained by this diagram:
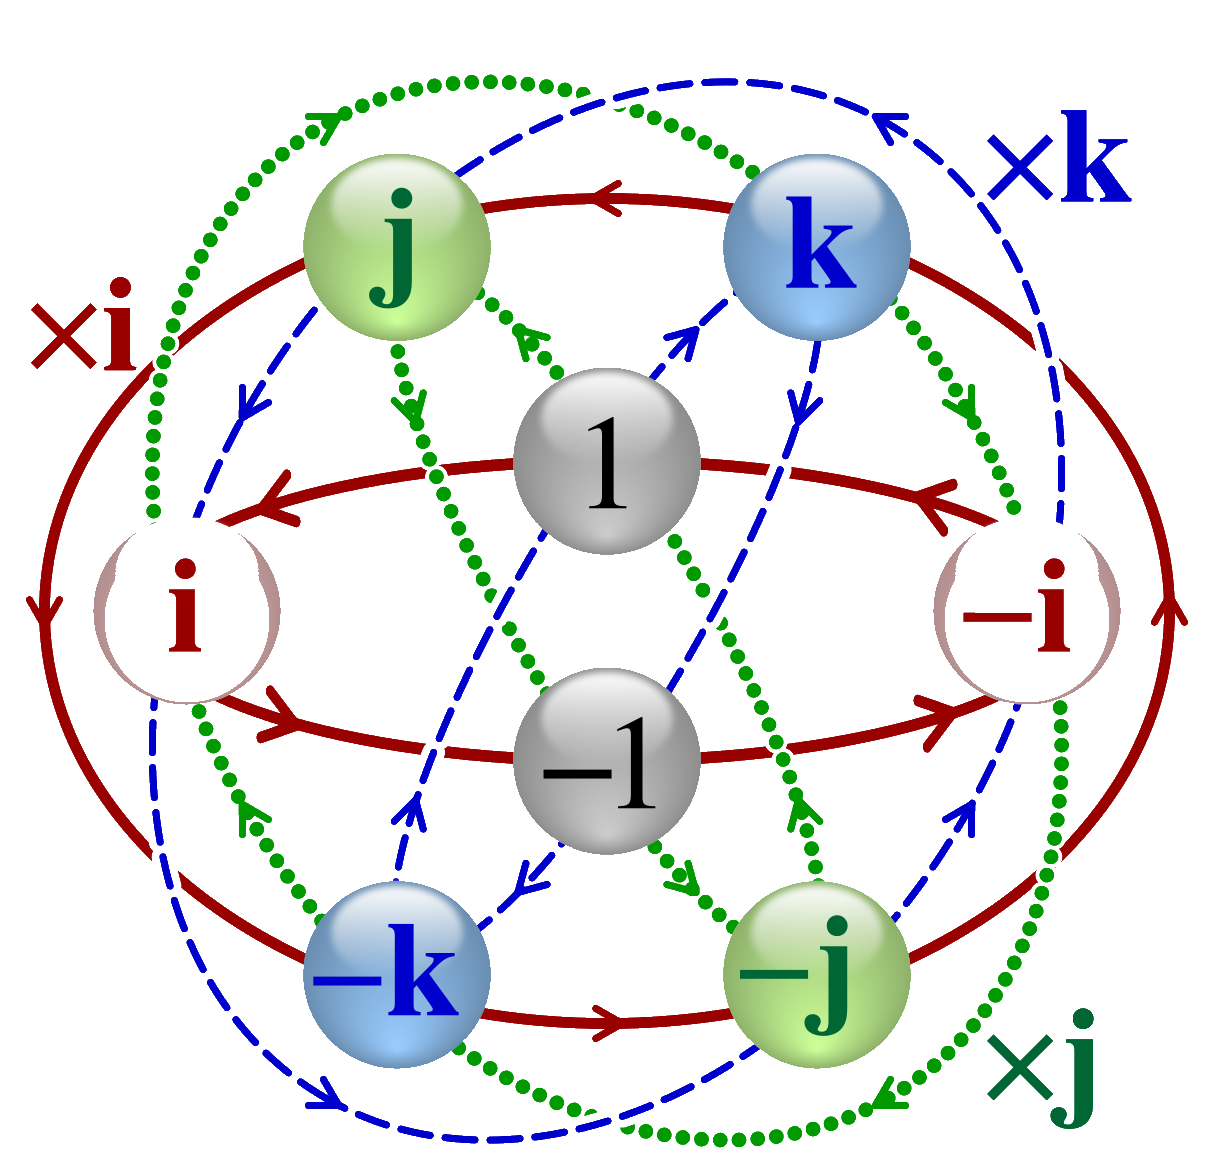
Indeed, the Godot engine uses the Transform3D class that
is a 3×4 matrix representing a transformation in 3D space. It contains a Basis, which on its own can represent rotation, scale, and shear.
So instead of using normal degrees with Euler angles, we use radians, quaternions and rotation matrices. Look what you make me do here: A math lesson. Aaaaah!
Go check the references I put at the top of this paragraph if you really want correct information by people that know what they are talking about. Me, when I tried to solve my own chall , I just changed random values in memory until I found the correct combination.
If we are a bit more clever, we read Godot's documentation On Transform3D, and we see that we have a rotation matrix that is by default:
1 0 1
0 1 0
0 0 1
we find exactly this in memory. Documentation also provides a constant, Flip-Z that is
 1  0  0
 0  0  0
 0  0 -1
and indeed, if we set the values in the memory viewer, we get the flag that is flipped!
But let's be even more clever, and use this Rotation converter , to convert a classic Euler angle of rotation X and Z of 180 (180,0,180). We get the matrix:
 -1  0  0
 0  0  0
 0  0 -1
and if we copy it, we get a part of the flag in the correct order. You just have to reduce your Z position, and you get the flag!
# advanced scripting: camera rotation
So what if we made a cool script that would rotate the camera and gradually reveal the flag? Let's mix some ASM and LUA to create this "advanced" feature.
# declaring variables in LUA
Just as we saw previously in autoassembly: getting the position address , we will start by creating variables for the character position and rotation matrix.
Problem: creating a variable means allocating it, registering it, setting it and unallocating it. 6 lines of code minimum for each variable… and here, we have 12 of them!
By checking the memory region of these variables, we see they are contiguous and of the same 4 byte size. So I can set one variable, lev3_z from an autoassembly script, exactly like before, and set the
11 other in a loop.
I tried different methods , all with some issues, before setting to a simpler one. let's review them:
setting the variables in a separate LUA script
I don't know how to do a loop in ASM, but the LUA CE api is very powerful. you can allocate variables just with registerSymbol("name", address).
We can do our loop:
names = {"y", "x", "sz2", "sz1", "sz0",
         "sy2", "sy1", "sy0", "sx2", "sx1", "sx0"}
d = {}

function initOtherVariables()
  -- get lev3_z from ASM autoassembly
  local tx = getAddressSafe("lev3_z")
  local z_addr = readPointer(tx)
  if x == nil then
	return
  end

  local offset = -4 -- z - 4
  for _, n in ipairs(names) do
        registerSymbol("lev3_"..n, z_addr + offset)
     offset = offset - 4
  end
end
- + pro: easy to set up in a separate script
- - con: it is in a separate script: so if your ASM script detects that
lev3_zmemory address changes, your LUA script won't notice it.
The solution is repeating this LUA method every second via a timer. But it adds bloat, it is inefficient, adds some delay and could create some desynchronisation bugs…
Writing LUA inside your AutoAssembly
The idea of writing an LUA script is clever, but it's the bridge between the ASM and LUA that creates problem. So why not write LUA in your ASM script?
This silly idea is made possible with a newish feature that not a lot of CE tutorial talk about: luacode You simply do like this in your auto assembly script:
newmem:
	mov rax, [rbx+424+8] // asm code

{$luacode myVar=eax}
	printf("Tutorial hit me called. testparam=%d",myVar)
	myVar=-2
	registerSymbol("myVarSymbol", myVar)
{$asm}

	sub [rbx+000007F8],eax // back to asm code
- + pro: the perfect solution to mix low level and advanced features!
- - con: some very strange undocumented issues.
While testing this, I had crashes in my cheat, bugs, and sometimes the LUA code would just not execute. So much that I wrote a dedicated paragraph: LUAcode Footguns.
waring!
If you plan on using LUACode in your cheat, go check out this section, as you will get those issues, without clear error messages, and only referenced on obscure threads of the CE forum.
Also watch out, the LUA code is of course not optimized, so if you run it 60 times per seconds, you can have slowdowns, especially if you call heavy methods like print .
You can even improve performance by coding in C, with the ccode block. With it you can even call libraries functions, and even LUA methods with some creativity!
Nocode solution: setting offsets from the GUI
Why set variables from code when the GUI already gives you all the tools? From the previous 2D position script we learned how to reference a variable in the game GUI. And when setting our pointer, we can add an offset!
Only to manually declare our 12 variables with lots of GUI clicks, but then we're set. (and there is a GUI entry copy-paste helper) We can even recover these pointers in a LUA script in an hackish way:
addrList = getAddressList()
local lev3_z = addrList.getMemoryRecordByDescription("lev3_z").CurrentAddress
- + pro: Ultra-simple, not really allocating variables
- - con: First GUI setup is tedious, accessing variables from LUA is hacking and in impossible in autoassembler ASM (but with
{$luacode}…)# creating the rotation animation
If you expect more math for the rotation animation, I'm done. As I am the game creator, I cheated, i created the animation in the game editor, and copied the rotation matrix values to my cheat sorry😅.
The script is just a timer that changes values gradually every 1/60 of second. It actually is in 2 steps as, with rotation matrices, nothing is as easy as "rotate 180°" and you have to swap some operations after a 90° spin.
y = 0°   ->  y = 90°  ->  y = 180°

1  0  1	     0  0  0      -1 0  0
0  1  0	 ->  0  1  0  ->  0  0  0
0  0  1	     -1 0  0      0  0 -1
making the code look like this:
function camSpin ()
  grad = 0.002;

  if (step == 0) then
     ...
     writeFloat(d["sx2"], readFloat(d["sx2"]) + grad)
     writeFloat(d["sz0"], readFloat(d["sz0"]) - grad)

    if (readFloat(d["sx2"]) >= 1) then
       step = 1
    end
  end

  if (step == 1) then
	 ...
     writeFloat(d["sx2"], readFloat(d["sx2"]) - grad)
     writeFloat(d["sz0"], readFloat(d["sz0"]) + grad)

    if (readFloat(d["sx2"]) <= 0) then
       step = 2
    end
  end
As always, you can find the full code here: flagquest_level3_3D_rotation_luacode.CEA. (real code has different values because the angle was a bit different)
# level 4: final fight
A final fight that is surprisingly easy to get trough. You just need to use some of the tricks you learned in the previous levels. So why not enjoy a bit of the gameplay? There are some cutscenes, different attack patterns, cool music, I'm certain the creator of the game spent quite some time on this level! 👀
In fact the game is really easy to solve, as it only relies on things you already did on previous steps.
The first part is dead simple: you have a damage multiplier, you can increase its value by getting some powerups. Find this value in memory and change it to "10000"
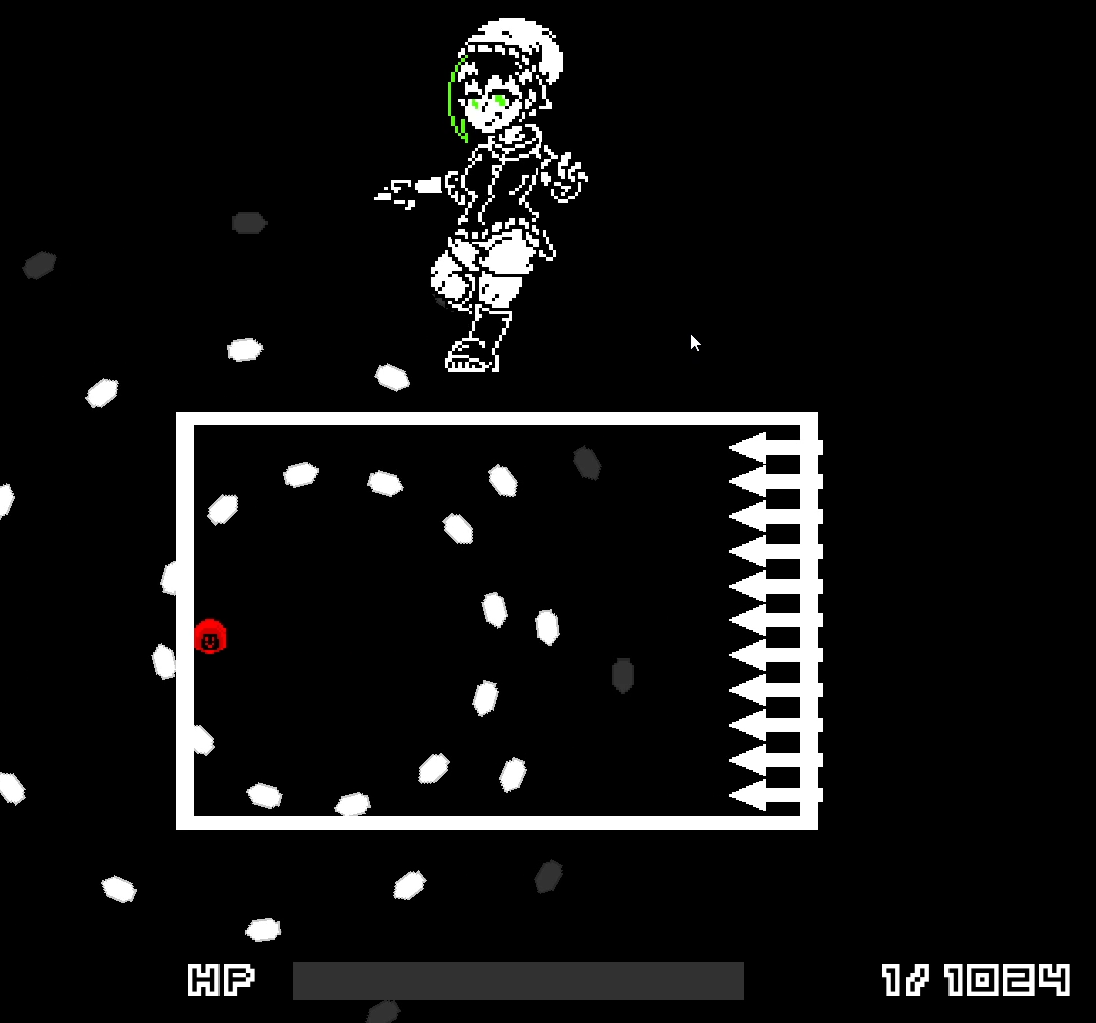
Second part is trickier: You are one-shot by the boss, levels are completely unfair, and you don't know the boss health value.
We will search for the value of the boss HP. We search for an unknown value (but over "9000", as we know the boss is beefy)
We attack, and the game tells us how much damage we give to the boss. Very fast (there is maybe a 2s timing, but you can pause the game), we search for a value that decrease by the attack number. We normally find only 1 value.
we right-click -> "find out what accesses this adress". We find:
cmp [rcx + 08], rax
Several solutions exist: we can
- NOP or modify it.
- put the debugger on the instruction, set
[rcx + 08]to 0- or set RAX to
[rcx + 08].
- or set RAX to
By debugging, we understand that this instruction corresponds to "BossHP == 0". If this instruction is true, we win the fight, and the challenge is over.
# Bonus stage: creating a GUI
| relevant resources | author | type |
|---|---|---|
| LUA Form GUI Tutorial | Cheat Engine | Wiki |
| How to Make a Trainer with Cheat Engine , HuniePop Trainer Example (slightly NSFW) | Stephen Chapman | Video |
Now that we have scripted all our hacks, why not gather them in a nice and fancy GUI? That way we can share our hack with people that won't need to understand how Cheat Engine works, even not needing to install Cheat Engine!
Cheat Engine has a pretty nice and simple WYSIWYG GUI editor. You choose a type of element in the Form Designer ribbon (an image, text box, checkbox, button, progress bar…), drag it to your trainer window, and then edit it's properties in the Object inspector window.
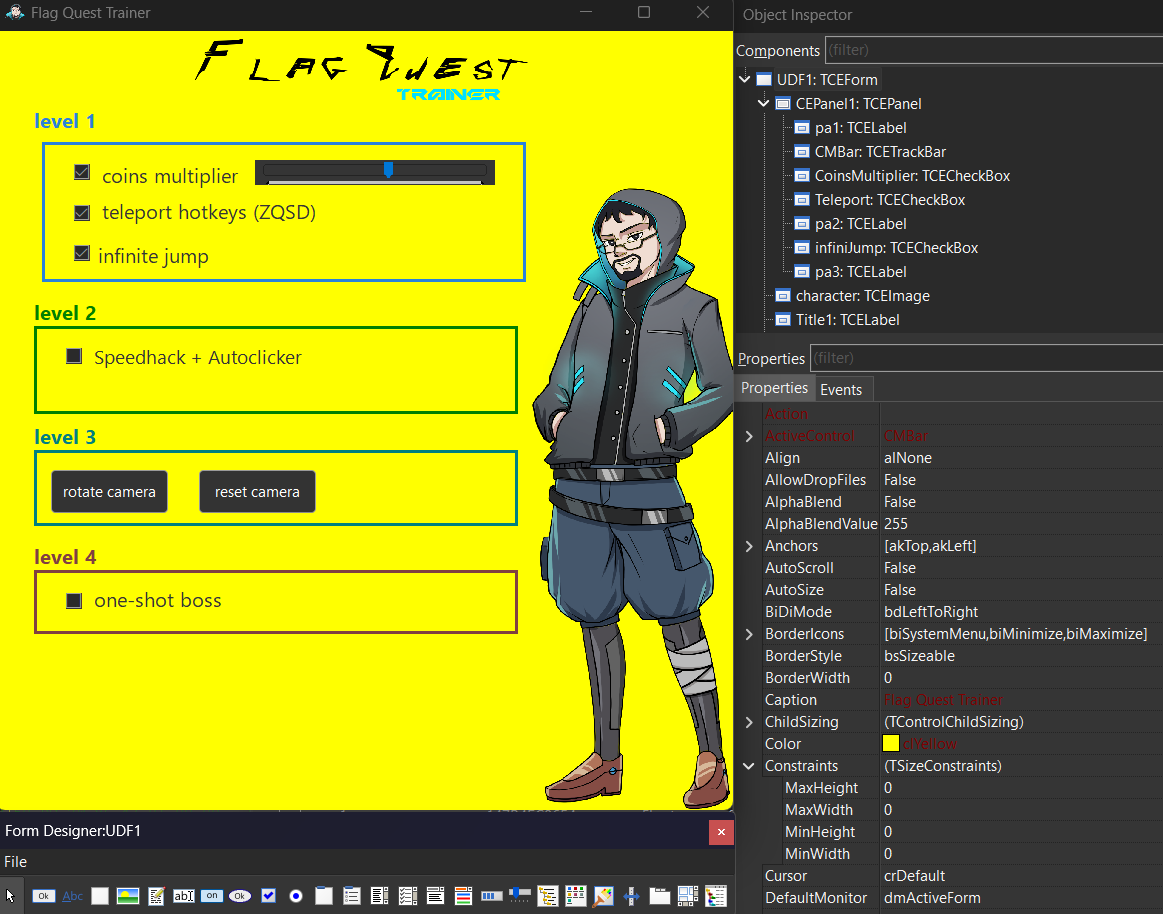
As you can see, I'm not a frontend gui, so I won't explain you how the responsive layout system works. Most important properties are color, height/width (but you can resize elements from the GUI).
Each element has it's own important properties you'll need to access: a checkbox has Checked, a slider (I mean "Trackbar") will have Min,Max,Frequency and most importantly Position.
The GUI editor only lists properties by alphabetical order, but You can find all unique properties and events of a GUI element on the wiki : Script Engine
How do we interact with our buttons and checkboxes? with Events! it's the second tab on the Object inspector window. There you can set the OnClick event for a button/checkbox, or OnChange for a slider.
There you can choose one of the method you coded in your main LUA script.
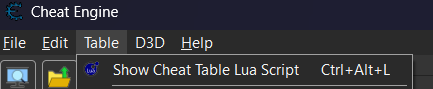
The main LUA script is a script that is auto-runned when you load your cheat table, and that will handle the GUI events. You can access it on the main window of CE, on the top ribbon -> Table -> Show Cheat Table LUA script
# GUI event scripts
Let's create a simple script that , when a checkbox is checked, will enable or disable one of the script we already defined, like the infinite jump:
if syntaxcheck then return end -- prevent execution while typing

addrList = getAddressList()

function setAct(name, value)
  addrList.getMemoryRecordByDescription(name).Active = value
end

function infiniteJump(sender)
  setAct("infinite jump", sender.Checked);
end
And that's it, in only a few lines! One more example, setting our coin multiplier variable with the value of a slider:
function coinsMultiSlideChange(sender)
  addr = getAddressSafe("coinsMultiplier")
  if addr ~= nil then
    sender.Hint = sender.Position
    writeInteger(addr, sender.Position)
  end
end
of course you can be quite creative. As it is a script that runs when you start the cheat, you can auto-attach the cheat to the game window:
PROCESS_NAME="flag_quest.exe"
function autoAttachTimer_tick(timer)
  if getProcessIDFromProcessName(PROCESS_NAME) ~= nil then
	  timer.destroy()
	  openProcess(PROCESS_NAME)
  end
end

autoAttachTimer = createTimer(nil)
autoAttachTimer.Interval = 100
autoAttachTimer.OnTimer = autoAttachTimer_tick
full script : main_gui.lua
You can now go back on the main CE window , File -> Save As, and save your project as a CETrainer, or even a standalone EXE so that people won't have to download Cheat engine to enjoy your cheat!
# Common scripting issues
The juicy bits for the people tinkering with Cheat Engine and banging their head to obscure bugs. Read carefully as you are likely to encounter those problems.
# LUA footguns
0.: Arrays start at 1.
And other common LUA issues. it's a powerful language, but with some quirks, like no += operator, concatenating strings with .. , != operator is actually ~= … check a bit the language syntax
1: Variables are global by default
If you create multiple scripts, variables may be shared if they have the same name.
Always declare your variables with local myVarName
2: Always delete your timers and hotkeys in the [DISABLE] section of your script.
While debugging your scripts, every modification will relaunch them. But if you have methods still running periodically with timers, or enabled hotkeys, the previous iteration of your code will live along your new script version. Effectively, your hotkeys and timers will run twice.
Be careful, as the "main" LUA script has no [DISABLE] section, so be wary of debugging timers/hotkeys in this specific script.
3: always put if syntaxcheck then return end at the start of your script
Or your script will run every time you type a character.
# LUACode footguns
Those problems are not very clearly documented, so I hope having them all collected in a single place will help some people!
# The script parser breaks and silently ignores all {$luacode} code blocks if you have a comment block with {} brackets
You would say "I don't even know you could do comments with {}".
But if you use a template for your script (you should), a metadata comment block is auto-added , like this:
{ Game   : Tutorial-x86_64.exe
  Date   : 2024-01-12

  This script does blah blah blah
}
and your LUA code is then just ignored without explication.
Solution: remove the comment block at the start and end of the script, or convert it to single line comment style.
# Indenting your {$luacode} instruction creates a parsing error.
When creating your script, you want to indent your code. But if you try to do for example:
code:
	mov RAX, 3F
	{$luacode rb=rbx}
	print(rb)
	{$asm}
	sub rax, 1
you will get an error: (print(rb)): this instruction can't be compiled.
Whatever the content of your first line, it will be invalid. As you had the bad idea to start your {$luacode} line with a tabulation.
At least the parser gives you an error this time? (even if non-relevant)
Solution: don't indent those {$} blocks. ex:
code:
	mov RAX, 3F
{$luacode rb=rbx}
	print(rb)
{$asm}
	sub rax, 1
# LUA runtime error are silent and can crash your game.
This one is quite obscure and I couldn't reproduce it on other tutorial games, only on my game.
Contary to classic LUA scripts where errors are logged in the LUA console, here runtime errors are completely silent. (You can access the LUA console in Memory viewer -> Tools -> LUA engine)
Errors like doing myVar = nonExistentVar + 2 will silently fail. The rest of your LUA code block will not be executed, but the rest of your ASM code after the block will.
Maybe this error state caused some memory issue, but it had the effect that every time I disabled my cheat, my game crashed. As you have to disable your cheat to modify it and debug it, it meant I had to relaunch my game at every change before finding my issue.
Solution: put debug print() everywhere and re-read your code T_T